How to Avoid Damage Charges When You Move Out of an Apartment: Protect Walls, Doors and Floors

You carry the last box out, close the door and feel done. Then an itemized bill shows up for a gouged door frame and scuffed hallway paint that you barely remember bumping.
The simplest way to avoid damage charges when moving out of an apartment is to treat the building like something you are moving through carefully, not just something you are leaving. Measure before you carry, pad whatever your furniture will touch, cover the floors, and take dated photos before and after. Most of it takes less than an hour of prep. This guide covers each step in the order you will need it.
How to Avoid Damage Charges When Moving Out of an Apartment: The Short Version
Protect the three places most likely to get hit, which are the walls, the door frames and the floors, and keep a photo record of what they looked like.
Moving damage rarely comes from one big accident. It comes from a sofa corner brushing paint a dozen times, or a dolly wheel rolling over the same spot of hardwood. Narrow spaces, heavy objects and tight turns are where small marks pile up.
One caution before going further. Leases and buildings handle deposits, move-out windows and damage rules differently, so this guide does not try to say what you owe. Read your lease and any move-out instructions from your property manager first. Those documents decide what applies to you.
Know the Difference Between Wear and Damage
Normal wear and tear is the slow, expected aging that comes from living in a place. Damage is anything beyond that, such as a gouge, a hole or a stain.
Zillow’s renter guide gives a useful picture. It lists faded paint, light floor scuffs and small nail holes as typical wear, while holes larger than picture-hanging hardware and deep gouges fall on the damage side. A guide from the Idaho Attorney General’s office, shared through Idaho Legal Aid, sorts examples the same way and puts chipped or gouged flooring and doors ripped off their hinges in the damage column. It also notes that the legal definition is state-specific, which is one more reason to check your own lease.
Moving day is where ordinary wear can turn into something more. A faint scuff from years of foot traffic is one thing. A fresh gouge along a hallway wall from a dresser corner is another. Your goal is to keep the first kind from becoming the second.
Take Dated Photos Before the First Box Moves
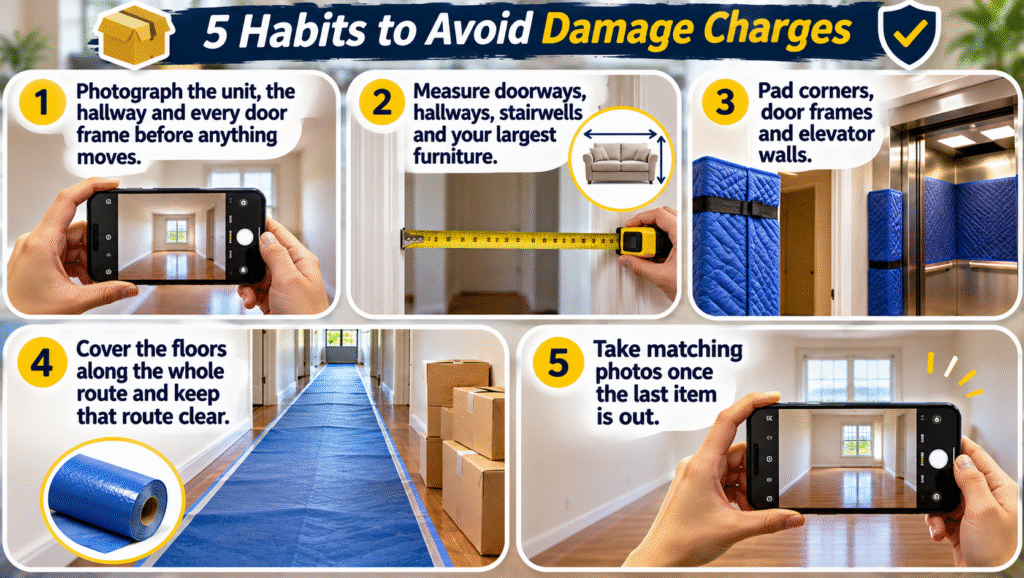
Photograph every room, the hallway, the stairwell landing and each door frame before you start moving things, and take them from angles you can repeat later.
Get close on the spots that take the most abuse: corners of walls, door frames at handle height, the floor along the route to the exit, and the area around the front door. Wide shots show context, and close-ups show detail. If your phone can stamp the date, turn that on. The Idaho guide recommends dated photos of the empty unit at move-in and move-out, and the same habit works on the way out.
If you took move-in photos when the lease began, dig them up and keep them in the same folder. The same Zillow guide cites its 2024 renter research showing that people who photographed the unit at move-in were somewhat more likely to get at least part of their deposit back, at 76 percent versus 70 percent. Renters who combined photos with video, a checklist and written notice to the landlord did better still, at 80 percent. That research is about move-in records, but a clean before-and-after set at move-out serves the same purpose: it shows what changed and what did not.
Email the photos to yourself or save them to cloud storage so the files and timestamps exist somewhere other than your phone.
Measure Doorways, Hallways and Stairwells Before Moving Day
Measure the narrowest points on your route, then measure your biggest items, before anyone lifts anything.
Start with the doorways. A door’s listed size is not the same as the space you can carry through, because the open door, the hinges and the stop all take up room. Measure the clear opening, then check hallway widths, tight turns, stair landings and the elevator interior.
Next, measure the sofa, mattress, dresser, bookcase and anything with a tall headboard or sharp corners. Compare each number to the tightest spot on the route. Where an item will not fit, you have options: take legs off tables and sofas, break down bed frames, or plan a tilt-and-pivot angle before you try it in the hallway.
If you think a door needs to come off its hinges to clear a piece of furniture, ask your property manager first. If they agree, bag the hinge pins and screws, label the bag, and tape it somewhere you will find it. Taking measurements the day before also gives you time to rent or borrow what you need, rather than improvising at the door with a heavy item in your arms.
Pad Corners, Door Frames and Elevator Walls
Cover every hard edge that might touch a wall, and wrap the frames and elevator surfaces along the route.
Moving blankets are the workhorse here. Wrap furniture corners before carrying, and drape folded blankets over door frames at hip and shoulder height, where most bumps land. Foam corner guards help at sharp turns. Hold padding in place with clips or a tape made for delicate surfaces, since ordinary packing tape can pull paint. Test a hidden spot first if you are unsure.
The elevator deserves the same attention. Many buildings require you to reserve it and may have their own pads, so ask the property manager what is expected and what is provided. Cardboard sheets or blankets on the inside walls give you backup.
If you are hiring help, ask how the crew protects the building, not just your belongings. Some apartment and condo movers in south-central Kentucky, for example, use padding on doorways and elevator walls and plan around hallways and stairwells before the truck arrives, which is the kind of preparation worth asking about. The Federal Motor Carrier Safety Administration’s moving checklist, which is written for interstate moves, also advises finding out in advance what a mover is responsible for if something is damaged. That is a good question on a local move too, and it is better asked in writing.
Protect Floors and Keep the Path Clear
Cover the floor along the whole route from the door to the truck, and clear everything else out of the way.
Sweep or vacuum first. Grit trapped under a runner acts like sandpaper. Then lay down floor runners, heavy cardboard or hardboard sheets, especially on hardwood, vinyl and tile. At the entrance, add a mat or towels to catch mud and water, which can stain floors and make them slippery.
Lift heavy items instead of dragging them, and use furniture sliders for pieces that must move across bare floors. If you use a hand truck, check the wheels. Soft rubber wheels are gentler on floors than hard ones, and a loaded dolly concentrates a lot of weight in a small area.
Then clear the route. Take down rugs, shoes, plants and wall decor near the path. Prop doors open with a rubber wedge so nobody has to bump them with an elbow while carrying a box. Keep staged boxes along one wall, away from the doorway, and use a spotter at corners and on stairs. A second set of eyes catches the swing of a headboard before it hits the paint.
Do a Final Walkthrough Before You Hand Back the Keys
Once the last item is out, walk the route and take your after photos before anyone else comes through.
Use the same angles as your first set. Open every door, check the frames, and look along the baseboards and the hallway. If you find a mark you can remove, such as a scuff on painted trim, a mild cleaner on a hidden test spot first will tell you whether it is safe to wipe. If you find something that looks like real damage, photograph it and talk with your property manager rather than hoping it goes unnoticed.
The Idaho guide suggests walking through the unit with the landlord at move-out if you can. The FMCSA checklist makes a similar point for movers: take one last look through the home before the truck leaves, and stay until the crew finishes. Give your property manager a forwarding address in writing, and keep your photos and any messages until your deposit matter is settled.
Frequently Asked Questions
Can I be charged for scratches on the walls when I move out?
It depends on your lease and on whether the mark counts as normal wear or damage. Light scuffs are often treated as wear, while deep gouges and large holes are more often treated as damage. Read your lease, ask your property manager what the building expects, and keep dated photos of the walls before and after the move.
Should I take photos before or after I move out?
Take both. Photograph the unit, hallway and door frames before any furniture moves, then repeat the same angles once the last item is out. Use dated photos where possible, get close on corners and floors, and save copies somewhere other than your phone so the files stay safe.
How do I protect door frames when moving furniture?
Measure first, then pad. Drape folded moving blankets over the frame at hip and shoulder height, and use foam corner guards at tight turns. Lift furniture rather than dragging it, and use a spotter to call out clearance. Clips or tape made for delicate surfaces hold padding better than ordinary packing tape, which can pull paint.
What is the best way to protect apartment floors during a move?
Sweep first, then cover the route with floor runners, heavy cardboard or hardboard. Use furniture sliders on bare floors, and choose dollies with soft rubber wheels. Place a mat at the entrance for mud and water. Lift heavy items instead of dragging them, since a single drag can leave a long scratch.
Who pays if movers damage the building?
That depends on your moving agreement and your lease, so ask both parties before moving day. Request in writing what the moving company is responsible for, tell your property manager who is doing the move, and photograph the route before and after. Documentation makes any later conversation about responsibility simpler for everyone.
Treat the Building as Part of the Move
Most damage charges are easy to prevent because they come from a small set of repeat problems: tight doorways, bare corners, unprotected floors and no record of what things looked like. Fixing those four takes a tape measure, a few blankets and a phone.
Before moving day, read your lease, ask the property manager about elevator and move-out rules, and take your before photos. On moving day, pad, cover and clear. Then walk the route once more and take your after photos. You will have done everything a careful tenant can do, and you will have the evidence to show it.